Master Bedroom Art Above Bed: 5 Ideas That Make a Statement
Ready to elevate your master bedroom? The space above your bed is perfect for a statement piece. Explore 5 impactful art ideas…
This post may contain affiliate links. If you make a purchase through these links, we may earn a commission at no additional cost to you.
Your master bedroom should be a retreat, a place where you can relax and recharge. While the bed itself is the clear centerpiece, the space directly above it offers a unique opportunity to add personality, style, and a touch of drama. Hanging art in this prime location isn’t just about filling empty space; it’s about creating a focal point that draws the eye and sets the tone for the entire room. A carefully chosen piece or collection can transform a simple bedroom into a truly special sanctuary.
Choosing the right art for this spot can feel a little daunting, though. You want something that looks great, feels personal, and is hung safely. This guide explores five distinct ideas for art above your master bed, offering inspiration and practical advice to help you make a statement that’s perfectly you.
Why Art Above the Bed Matters
The wall above your bed is arguably the most important wall in the room. It’s the first thing you often see when you enter, and it’s certainly what you look at when you’re lying down. Because of this, the art you place here has a significant impact on the room’s overall feel.
Creating a Focal Point
Think of the wall above your bed as a blank canvas waiting for its masterpiece. When you add a piece of art here, you immediately create a visual anchor for the room. This focal point helps ground the space and gives the eye somewhere to rest. Without something here, the wall can feel empty and the room might lack a sense of completion. A strong piece of art pulls the room together, making it feel more intentional and designed.
Setting the Mood and Atmosphere
The art you choose plays a huge role in establishing the mood of your master bedroom. Do you want the room to feel calm and serene? A peaceful landscape or abstract piece with soft colors can help achieve that. Prefer something more energetic or dramatic? Bold colors, dynamic compositions, or striking photography can create a different vibe. The subject matter, colors, and style of the art all contribute to the emotional atmosphere of your personal space. It’s about creating a feeling, not just filling a wall.
Reflecting Personal Style
Your master bedroom is one of the most personal spaces in your home. The art you choose for above your bed is a fantastic way to showcase your personality and what you love. It could be a piece that reminds you of a special trip, artwork by an artist you admire, or simply something with colors and textures that make you happy. This isn’t a formal living room; you have more freedom to choose something that truly resonates with you on a personal level. It makes the room feel uniquely yours.
Key Considerations Before Choosing Art
Before you fall in love with a specific piece, it’s smart to think about a few practical things. Taking measurements and considering your existing decor will save you time and ensure your chosen art looks its best and fits perfectly.
Understanding Size and Scale (The 2/3 Rule Explained)
One of the most common mistakes people make is hanging art that’s too small for the space above the bed. A tiny picture above a large headboard can look lost and out of proportion. A good guideline to follow is the “2/3 rule.” This suggests that the width of your art (or the total width of a grouping of art) should be approximately two-thirds the width of your bed or headboard.
For example, a standard king-size bed is about 76 inches wide. Using the 2/3 rule, your art should be roughly 50 to 60 inches wide. This proportion ensures the art feels substantial enough to balance the size of the bed without overwhelming it. It creates a sense of visual harmony. While this is a helpful rule of thumb, it’s not a strict law. You can adjust based on your specific room and the impact you want to make, but it’s a great starting point for figuring out the right scale.
Considering Room Dimensions and Ceiling Height
The size of your room and the height of your ceiling also influence your art choices. In a room with high ceilings, you might be able to go taller with your art or even stack pieces vertically in a gallery wall. A very large, tall piece can emphasize the ceiling height and make the room feel grander.
In a room with lower ceilings, you’ll want to be careful not to hang art that’s too tall, as it can make the ceiling feel lower. A wider, more horizontal piece might work better in this situation. Also, consider the overall size of the room. In a smaller bedroom, an overly large piece might feel too dominant, while in a spacious room, a small piece could feel insignificant. It’s all about creating balance within the specific dimensions of your space.
Harmonizing with Existing Decor and Color Palette
Your new art should feel like it belongs in the room. Think about the colors already present in your bedding, walls, furniture, and accessories. Does the art complement these colors, or does it clash? You don’t need to match colors exactly, but the art should work within the existing palette.
Consider the style of your decor too. Is your room modern, traditional, bohemian, minimalist, or something else? The art should ideally align with this style. An abstract piece might look fantastic in a modern room but feel out of place in a very traditional setting. The goal is to create a cohesive look where everything feels connected.
Prioritizing Personal Style and Comfort
Ultimately, the most important consideration is your personal taste and what makes you feel comfortable and happy in your bedroom. This is your private space, so choose art that you genuinely love looking at. Don’t feel pressured to follow trends if they don’t resonate with you. The art above your bed should contribute to a feeling of relaxation and peace, or whatever mood you desire for your sanctuary. It’s okay to break some “rules” if a piece speaks to you and feels right for your room.
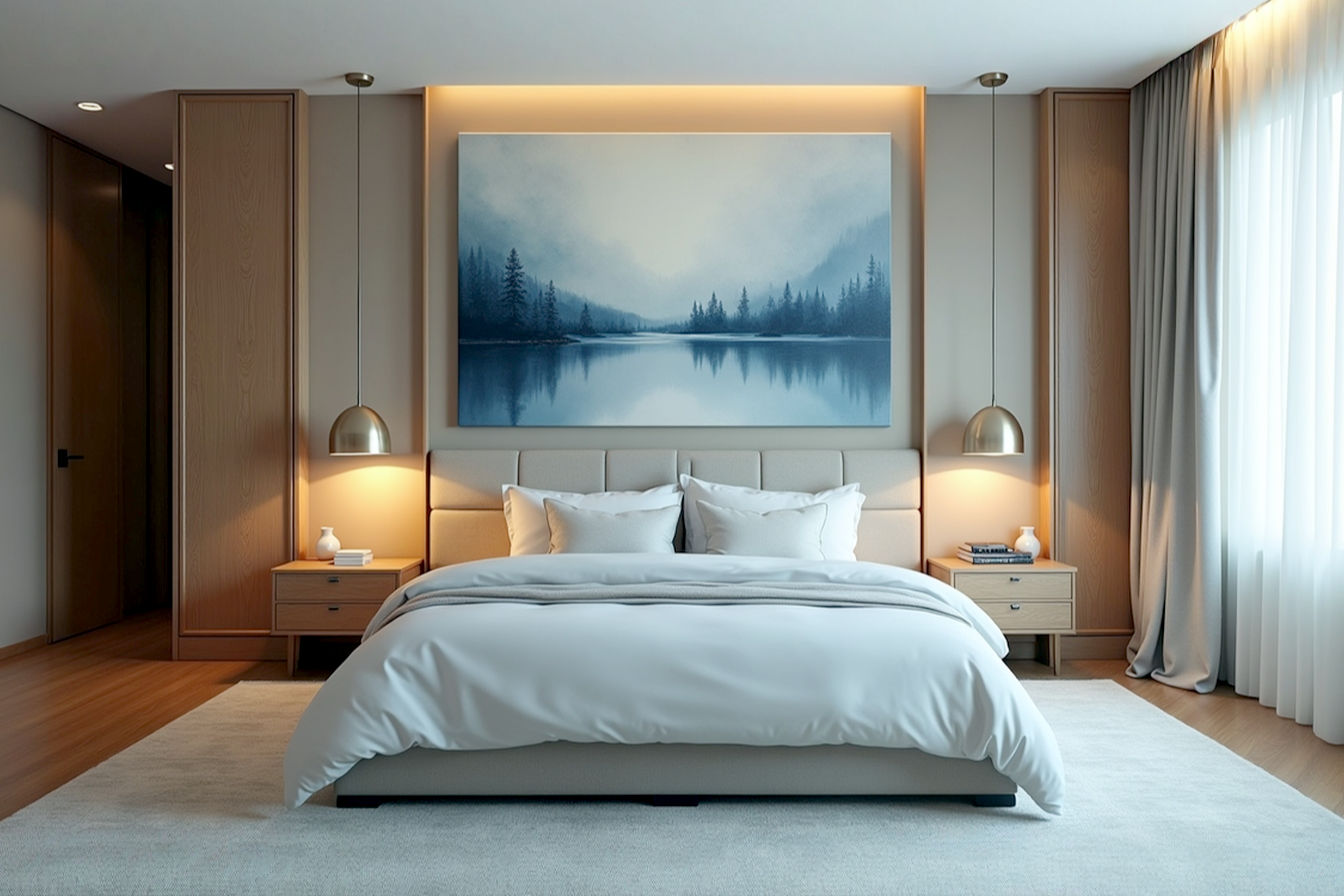
Idea 1: The Power of a Single Oversized Canvas
One of the most impactful ways to make a statement above your master bed is with a single, large piece of canvas art. This approach is bold, modern, and immediately grabs attention.
Making a Bold Statement with Scale
An oversized canvas acts as a dominant visual element. Its sheer size creates a sense of presence and importance that smaller pieces can’t replicate. It simplifies the wall decor, making a clear and strong statement without the visual clutter of multiple frames. This works especially well in rooms where you want a clean, contemporary feel. The large scale automatically draws the eye and becomes the undeniable focal point of the wall.
When we talk about “oversized,” we’re generally referring to a piece that takes up a significant portion of the wall space above the bed, often adhering to or exceeding the 2/3 width rule. A canvas measuring 40×60 inches or even larger can feel perfectly scaled above a queen or king-size bed, depending on the wall dimensions. The large format allows the viewer to become fully immersed in the artwork.
Choosing the Right Subject and Style
The subject matter and style of an oversized canvas are crucial because they will heavily influence the room’s atmosphere.
- Abstract Art: This is a popular choice for modern bedrooms. Abstract pieces use color, shape, and form to evoke emotion without representing a specific object. A large abstract canvas can add a pop of color, introduce interesting textures through paint application (like impasto, where paint is applied thickly), or create a sense of calm with soft, blended hues. The lack of a literal subject can be very soothing in a bedroom.
- Landscapes: A large landscape painting or photograph can transport you to another place. Peaceful scenes of nature, like a serene forest, a misty mountain range, or a calm ocean view, can create a sense of tranquility and escape. More dramatic landscapes, like a stormy sky or a vibrant sunset, can add energy. The expansive nature of a landscape works well on a large canvas.
- Portraits or Figures: While less common directly above the bed for some, a large portrait or figurative piece can add a deeply personal and artistic touch. Choose something that feels right for your private space.
- Photography: Oversized photographic prints, whether black and white or color, can be incredibly striking. This could be fine art photography, a stunning nature shot, or even a high-quality personal photo. The clarity and detail in a large print can be captivating.
Consider the emotional impact of the image. Since this is above your bed, you might prefer something calming or inspiring rather than something overly stimulating or unsettling.
Framing and Presentation Options
Oversized canvases offer several presentation options:
- Gallery Wrapped: This is a very popular, modern look where the canvas is stretched around a wooden frame (called stretcher bars) and the image continues around the sides. It doesn’t require an external frame and has a clean, minimalist feel. The depth of the stretcher bars (often 1.5 inches or more) gives the piece dimension on the wall.
- Floating Frame: A floating frame is a type of frame that sits slightly set back from the edge of the canvas, creating a small gap or “float” between the canvas and the frame. This gives the illusion that the canvas is floating within the frame. It offers a finished look while maintaining a modern aesthetic and protecting the edges of the canvas. Floating frames are commonly made of wood or metal.
- Traditional Frame: While less common for very large canvases due to weight and cost, a traditional frame can add a classic or ornate touch depending on the frame style. For large pieces, a sturdy frame is essential for structural integrity.
The choice of presentation affects the overall style and how the art interacts with the room. A gallery wrap is casual and contemporary, while a floating frame adds a touch more sophistication.
Technical Aspects of Hanging Large Canvases
Hanging a large, heavy canvas safely above your bed requires careful attention to detail. You absolutely don’t want it falling down.
- Weight: Large canvases, especially if framed, can be surprisingly heavy. Always check the weight of the artwork before choosing hanging hardware.
- Finding Studs: The most secure way to hang heavy items on a wall is to anchor them directly into the wall studs. Studs are the vertical wooden (or sometimes metal) beams that frame the walls in your house. Using a stud finder is crucial for locating these solid points. Hanging heavy art directly into drywall using only basic hooks is risky.
- Appropriate Hardware: Use heavy-duty picture hangers or D-rings with picture wire rated for the weight of your artwork. For very large or heavy pieces, consider using multiple hangers or a specialized hanging system designed for heavy loads. French cleat systems are an excellent option for heavy art; they involve two interlocking pieces, one attached to the wall (levelly mounted into studs) and one attached to the artwork, which slide together to create a strong, secure hold that distributes the weight evenly.
- Professional Installation: If you’re unsure about hanging a large, heavy piece yourself, it’s wise to hire a professional art installer. They have the tools, expertise, and experience to ensure the artwork is hung securely and correctly, giving you peace of mind.
Remember to hang the bottom of the canvas about 6-8 inches above the top of your headboard (or where a headboard would be if you don’t have one). This creates a visual connection without feeling cramped.
Idea 2: Curating a Dynamic Gallery Wall
If a single large piece isn’t your style, or if you have a collection of smaller artworks you love, a gallery wall above the bed can create a dynamic and personal statement.
Creating Visual Interest with Multiple Pieces
A gallery wall is essentially a curated collection of art, photos, or other decorative objects arranged together on one wall. Above a bed, this creates a rich visual display that’s much more complex and layered than a single piece. It allows you to tell a story or showcase different aspects of your personality through various images and objects. The different sizes, shapes, and styles within the collection create visual interest and depth.
Unlike a single piece, a gallery wall invites the viewer to look closer and explore the individual elements. It can feel less formal and more personal, like a curated peek into your world.
Planning Your Gallery Wall Layout (Symmetrical vs. Asymmetrical)
Planning is key to a successful gallery wall, especially above a bed where balance is important.
- Symmetrical Layout: This involves arranging pieces in a balanced, often grid-like pattern. You might use identical frames and evenly space the artwork. This creates a sense of order, calm, and formality. It’s a good choice if you prefer a neat and structured look. A common symmetrical approach is using two or three equally sized pieces hung horizontally above the bed.
- Asymmetrical Layout: This is a more freeform approach where pieces of different sizes, shapes, and frames are arranged in a less structured way. The balance is achieved visually rather than through strict symmetry. This creates a more dynamic, eclectic, and casual feel. You might start with a central piece and build outwards, or create a cluster of varying sizes. The key is to achieve a pleasing visual weight distribution, ensuring one side doesn’t feel too heavy.
Before putting holes in the wall, it’s highly recommended to plan your layout on the floor first. Arrange your pieces on the floor in the desired configuration, experimenting with spacing until you find a layout you like. You can even cut out paper templates the size of each frame and tape them to the wall to visualize the arrangement before hanging. This helps ensure the overall size of the gallery wall fits the space above your bed appropriately, again aiming for roughly 2/3 the width of the bed.
Mixing and Matching Frames, Styles, and Mediums
Part of the appeal of a gallery wall is the ability to mix different elements.
- Frames: You can use matching frames for a cohesive, polished look (especially effective in symmetrical layouts) or mix different frame styles, colors, and materials (wood, metal, ornate, simple) for a more eclectic, collected feel (perfect for asymmetrical layouts). Mixing frames adds visual texture and personality.
- Styles: Combine different types of art – photographs, illustrations, paintings, prints, even mirrors or small decorative objects. This variety makes the wall more interesting. You might group pieces by theme (e.g., travel photos), color palette, or a mix of everything you love.
- Mediums: Don’t limit yourself to flat art. Incorporate small sculptural pieces, wall hangings, or even empty decorative frames to add dimension and texture to the gallery wall.
While mixing is encouraged, try to have some unifying element, whether it’s a consistent color running through the pieces, a similar subject matter, or a dominant frame color, to keep the collection from looking messy or chaotic.
Step-by-Step Guide to Hanging a Gallery Wall
Hanging a gallery wall requires a bit more effort than a single piece, but it’s definitely achievable.
- Plan Your Layout: As mentioned, arrange pieces on the floor or use paper templates on the wall to finalize your desired arrangement and spacing. Measure the total width and height of your planned layout.
- Mark the Wall: Once the layout is finalized, use a pencil to lightly mark the wall where the top center of the entire arrangement should be. Then, using your paper templates or measurements from your floor layout, mark the precise hanging point for each individual piece. Use a level to ensure your initial horizontal and vertical guidelines are straight.
- Install Hanging Hardware: For each piece, determine the correct type of hanger based on its weight and the type of wall you have (drywall, plaster). Use picture hooks, D-rings, or sawtooth hangers. For heavier pieces, locate studs and use screws, or use appropriate drywall anchors (like toggle bolts or self-drilling anchors) rated for the weight if studs aren’t in the right spot.
- Technical Tip: Drywall Anchors: Standard plastic expansion anchors are fine for very light items. For moderate weight, plastic toggle anchors or self-drilling metal anchors work better. For heavier items where a stud isn’t available, metal toggle bolts or molly bolts provide much stronger support by expanding behind the drywall. Always check the weight rating on the anchor packaging.
- Hang Your Art: Starting with a central piece or a key piece in your layout, carefully hang each item according to your marks. Use a level frequently as you go to ensure each piece is straight and the overall arrangement remains aligned.
- Adjust and Refine: Once everything is hung, step back and look at the overall effect. You might need to make small adjustments to spacing or straighten pieces.
Remember the safety aspect: ensure all pieces, especially heavier ones, are securely fastened to the wall using appropriate hardware and, ideally, anchored into studs or robust anchors.
Idea 3: Adding Texture with Tapestries and Textile Art
Moving away from traditional framed art, tapestries and other forms of textile art offer a completely different way to add a statement above your bed, focusing on texture, softness, and warmth.
Introducing Warmth and Softness
Unlike hard, flat surfaces like canvas or framed prints, textiles bring a tactile quality to the wall. A large tapestry or woven piece immediately softens the space and adds a sense of comfort and coziness, which is perfect for a bedroom. The fibers absorb sound slightly, contributing to a quieter, more peaceful atmosphere. The texture itself becomes a key visual element.
Textile art can range from intricate, hand-woven pieces to simpler fabric hangings. They often have a more relaxed, bohemian, or natural feel, though modern and abstract textile art also exists.
Exploring Different Textile Mediums and Styles
The world of textile art is diverse:
- Tapestries: Traditionally, tapestries are woven pictorial textiles used for wall hangings. Modern tapestries can range from large, printed fabric panels to hand-woven pieces with abstract designs. They often bring color and pattern to the wall.
- Woven Wall Hangings: These are typically smaller than traditional tapestries and often feature more pronounced textures, fringes, and sometimes incorporate other materials like wood or beads. They can be abstract or have geometric patterns. Macrame is a popular type of woven wall hanging, created using knotting techniques.
- Fiber Art: This is a broader category that includes various techniques like felting, quilting, embroidery, and mixed media using fibers. Fiber art pieces can be highly sculptural and dimensional.
The style can vary widely, from rustic and bohemian with natural fibers and earthy tones to modern and minimalist with clean lines and geometric patterns in bold colors. A large, abstract woven piece can add a sophisticated, artistic touch, while a colorful, patterned tapestry might create a more vibrant, global-inspired feel.
Choosing the Right Size and Placement
Similar to other art forms, scale is important. A large tapestry or a substantial woven piece works best above a master bed to make a statement. Aim for a width that is at least two-thirds the width of your bed. Because textiles are generally lighter than framed art or canvas, you might be able to go even larger without significant weight concerns, but always check the specific piece.
Consider the texture and pattern of the textile art in relation to your bedding and other fabrics in the room. You don’t want everything to compete too much. If your bedding is highly patterned, a more subtly textured or solid-colored textile piece might be a better choice. If your bedding is simple, you can be bolder with the textile art.
Placement is usually centered horizontally above the bed. The height should follow similar guidelines to framed art, starting about 6-8 inches above the headboard.
Hanging Techniques for Textiles
Hanging textile art is often simpler than hanging heavy framed pieces, but the method depends on the specific type of textile.
- Rod and Brackets: Many tapestries and woven hangings are designed to be hung from a rod, similar to curtains. This requires installing brackets on the wall and threading the textile onto the rod. Ensure the brackets are securely fastened to the wall, especially for wider or heavier textiles.
- Sleeve and Rod: Some textiles have a fabric sleeve sewn onto the back. A rod is inserted through the sleeve, and the rod is then hung on hooks or brackets. This provides good support and helps the textile hang flat.
- Command Hooks or Strips: For lightweight textile pieces, adhesive Command hooks or strips can be an easy, damage-free option. However, always check the weight limit on the packaging and test them first. These are generally not suitable for large or heavy textiles.
- Nails or Pushpins: Very lightweight fabrics might be hung directly with small nails or even decorative pushpins, but this can damage the textile and isn’t recommended for anything with significant weight or value.
- Velcro: For flat textiles, industrial-strength Velcro can be attached to the back of the textile and the wall for a clean, hidden hanging method. Ensure the adhesive is strong enough for the fabric and wall type.
The key is to ensure the textile is hung evenly and securely so it doesn’t sag or become a safety hazard. Because textiles are softer, the risk of injury if one were to fall is lower than with framed art or mirrors, but secure hanging is still important.
Idea 4: Incorporating Sculptural and Dimensional Pieces
For a truly unique statement, consider adding three-dimensional or sculptural elements to the wall above your bed. This moves beyond traditional flat art and adds significant depth and intrigue.
Adding Depth and Intrigue
Sculptural wall art literally adds another dimension to your decor. Instead of just color and pattern on a flat surface, you get variations in depth, shadow, and form. This creates a more dynamic and visually interesting display. It can make the wall feel less static and bring a sense of movement or texture that flat art can’t provide.
Dimensional pieces can range from subtle relief sculptures to bold, abstract constructions. They often catch the light in interesting ways, creating shadows that change throughout the day.
Types of Sculptural Wall Art
The options for sculptural wall art are vast and varied:
- Metal Art: This is a popular choice and can range from intricate laser-cut panels to abstract welded forms. Metal art can be sleek and modern, rustic and industrial, or ornate and traditional, depending on the design and finish. It often adds a touch of shine or reflectivity.
- Wooden Sculptures: Carved or assembled wooden pieces can bring warmth and natural texture. This could be a single carved panel, a collection of wooden objects, or abstract forms created from wood.
- Ceramic or Plaster Art: Three-dimensional pieces made from ceramic or plaster can offer interesting textures and shapes. This might include decorative plates (hung securely!), ceramic tiles arranged artistically, or molded plaster forms.
- Mixed Media: Some artists combine various materials like metal, wood, fabric, or found objects to create unique sculptural wall pieces. These often have a very contemporary and artistic feel.
- Architectural Salvage: Reclaimed architectural elements like decorative grates, old window frames (without glass!), or carved panels can be repurposed as unique wall art.
When choosing a sculptural piece, consider its weight and how it will be mounted. Some pieces might be surprisingly heavy or require specific mounting hardware.
Placement and Visual Balance
With sculptural pieces, placement is crucial not just for aesthetics but also for safety. Ensure the piece is hung high enough that you won’t bump your head on it when getting into or out of bed.
Consider the visual weight of the sculpture. A large, heavy-looking piece needs to be balanced by the bed below it. If you’re using multiple smaller sculptural elements, arrange them in a way that feels balanced, similar to planning a gallery wall. Think about how the piece will cast shadows and how that will affect the wall throughout the day.
Sculptural pieces can sometimes feel more dominant than flat art, so consider the overall busyness of your room. In a minimalist room, a single, bold sculpture can be incredibly effective. In a room with lots of patterns and objects, a simpler, less intricate piece might be better.
Securely Mounting Dimensional Art
Hanging sculptural and dimensional art requires robust and appropriate hardware. Because these pieces often have weight distributed unevenly or protrude from the wall, they need extra care to ensure they are secure.
- Manufacturer’s Recommendations: Always follow the hanging instructions provided by the manufacturer or artist. They know the best way to hang their specific piece safely.
- Heavy-Duty Hardware: Use screws, substantial hooks, or specialized mounting brackets designed for the weight and type of the sculpture. Avoid using standard picture hooks or nails unless the piece is very lightweight.
- Locate Studs: Whenever possible, anchor sculptural pieces directly into wall studs for maximum security. Use a stud finder to locate them.
- Appropriate Anchors: If anchoring into drywall is necessary, use heavy-duty drywall anchors specifically rated for the weight of the sculpture. Toggle bolts are often a good choice for heavier items in drywall.
- Multiple Hanging Points: For larger or heavier sculptures, use multiple hanging points to distribute the weight evenly across the wall. This reduces the stress on any single point.
- Clearance: Ensure the piece is mounted securely and doesn’t wobble or pose a risk of falling if accidentally bumped. Consider the depth of the piece and how far it extends from the wall.
Safety is paramount when hanging anything three-dimensional above a bed. Take your time, use the right tools and hardware, and consider professional installation for complex or very heavy pieces.
Idea 5: The Reflective Statement of Mirrors
While not traditionally considered “art” by everyone, a well-chosen mirror hung above a bed can function as a powerful statement piece, adding light, depth, and visual interest.
Enhancing Light and Space
Mirrors are masters of illusion. Hanging a mirror above your bed can instantly make your master bedroom feel larger and brighter by reflecting natural and artificial light around the room. This is particularly effective in smaller bedrooms or rooms that don’t get a lot of natural light. The reflection of the room itself becomes part of the wall display.
A mirror can also reflect a view from a window, bringing the outdoors in and adding a dynamic element that changes throughout the day.
Choosing a Statement Mirror Style
Just like artwork, mirrors come in countless styles, shapes, and frames that can make a statement:
- Large Framed Mirror: A single, oversized mirror with a decorative frame can be a stunning focal point. The frame itself acts like the “art,” adding style and personality. Choose a frame that complements your existing decor – a rustic wooden frame for a farmhouse look, an ornate gold frame for a glamorous feel, a sleek metal frame for a modern space.
- Unframed Mirror: For a very minimalist and contemporary look, an unframed mirror (often with a beveled edge for a touch of detail) can provide reflection without the visual weight of a frame.
- Decorative Mirrors: Mirrors don’t have to be plain rectangles. Consider mirrors with unique shapes (round, starburst, abstract) or those made up of multiple smaller mirrored segments arranged artistically. These pieces are designed to be sculptural and decorative as well as reflective.
- Antiqued or Distressed Mirrors: Mirrors with an aged or distressed finish can add a vintage or rustic charm and provide a softer, less stark reflection.
The style of the mirror’s frame or its unique design is what turns a functional object into a statement piece of wall decor.
Placement and Reflection Considerations
When hanging a mirror above your bed, think carefully about what it will reflect. You want it to reflect something pleasant – a window with a nice view, a beautiful piece of furniture on the opposite wall, or another piece of art. Avoid placing a mirror where it will primarily reflect a cluttered area or something you don’t want to see magnified.
The size of the mirror should follow similar guidelines to art – aim for a width that is approximately two-thirds the width of your bed. A mirror that’s too small will look out of place, while one that’s too wide can feel overwhelming.
Height is also important. Hang the mirror so that the reflection is at a comfortable viewing level when you are in the room. The bottom of the mirror should generally be 6-8 inches above the headboard.
Safety First: Hanging Mirrors Securely
Hanging a mirror, especially a large or heavy one, above a bed requires the utmost attention to safety. Glass is fragile, and a falling mirror poses a significant hazard.
- Weight: Mirrors can be very heavy due to the glass and frame materials. Always check the weight.
- Heavy-Duty Hardware: Use heavy-duty picture wire or specialized mirror hanging kits rated for the specific weight of your mirror. Mirrors often come with their own heavy-duty D-rings or hanging brackets attached to the back; use these and appropriate wall hardware.
- Locate Studs: Whenever possible, hang mirrors directly into wall studs using strong screws. This is the most secure method. Use a stud finder to locate studs.
- Appropriate Anchors: If you cannot hit a stud, use heavy-duty drywall anchors specifically designed for hanging mirrors or very heavy objects in drywall. Toggle bolts are a strong option for heavy loads in drywall. Do not rely on basic plastic anchors for a mirror above your bed.
- Multiple Hanging Points: Use at least two, preferably more, secure hanging points for a mirror above a bed to distribute the weight and provide redundancy in case one point fails.
- Professional Installation: For large, heavy, or awkwardly shaped mirrors, hiring a professional installer is highly recommended. They have the experience and specialized hardware to ensure the mirror is mounted safely and securely, providing essential peace of mind.
Never compromise on safety when hanging a mirror above your bed. It’s better to over-engineer the hanging system than to risk the mirror falling.
Practical Tips for Hanging Art Above Your Bed
Regardless of which type of art you choose, following some basic practical steps will help ensure your piece is hung correctly and safely.
Measuring and Marking for Perfect Placement
Accurate measurement is the foundation of good art placement.
- Determine the Center: Find the center point of your bed or headboard. Measure the width of the bed and divide by two. Mark this center point lightly on the wall above the bed with a pencil. This is where the center of your art (or the center of your gallery wall arrangement) should align horizontally.
- Determine the Ideal Height: A common guideline is to hang the bottom of your art piece(s) about 6 to 8 inches above the top of your headboard. This creates a visual connection between the bed and the art without leaving too much empty space. If you don’t have a headboard, estimate the height of a typical headboard (around 40-50 inches from the floor) and measure up from there, or use the height of your pillows as a guide, leaving about 6-8 inches above the propped-up pillows.
- Mark the Hanging Point(s): Measure the distance from the top of your artwork to the hanging hardware on the back (e.g., the wire when pulled taut, the top of the D-rings, the sawtooth hanger). Measure down from your desired top-of-art height on the wall by this distance and mark the precise spot(s) where your nail(s) or screw(s) will go. Use a level to ensure your marks are horizontally aligned if using multiple hangers.
Taking these measurements carefully helps avoid unnecessary holes in the wall and ensures your art is centered and at the right height.
Selecting the Right Hanging Hardware (Considering Wall Type and Art Weight)
Choosing the correct hardware is critical for safety. The type of hardware depends on two main factors: the weight of your artwork and the type of wall material (most commonly drywall or plaster over studs).
- For Lightweight Art (under 5-10 lbs): Small picture hooks with thin nails, adhesive hooks (like Command hooks, checking weight limits), or small finishing nails might suffice for very light pieces like small framed prints or lightweight textiles.
- For Medium Weight Art (10-25 lbs): Standard picture hooks with thicker nails or screws, or self-drilling drywall anchors can work if you can’t hit a stud.
- For Heavy Art (over 25 lbs) or Mirrors: This is where security is paramount.
- Into Studs: The best option is to locate wall studs using a stud finder and use strong wood screws or specialized stud hangers to attach your art directly to the stud. This provides the most reliable support.
- Into Drywall (No Stud): If a stud isn’t in the correct location, you must use heavy-duty drywall anchors. Options include metal toggle bolts (very strong, require drilling a larger hole), molly bolts (expand behind the drywall), or heavy-duty self-drilling metal anchors rated for significant weight. Never use basic plastic anchors for heavy items above a bed.
- Specialized Systems: For very large or heavy pieces, consider using a French cleat system or a heavy-duty picture hanging system that distributes weight across multiple points.
Always check the weight rating on the hardware packaging and choose hardware that is rated for more than the actual weight of your artwork to be safe.
Ensuring Secure and Safe Installation (The Importance of Studs or Anchors)
We’ve mentioned it multiple times because it’s that important: secure installation is non-negotiable for art above your bed.
- Locate Studs: Use a reliable stud finder to locate the wooden or metal studs behind your drywall or plaster. These provide solid structural support. Mark their locations.
- Drill Pilot Holes: If screwing into studs or using certain types of anchors, drill small pilot holes first to make insertion easier and prevent splitting wood or damaging drywall unnecessarily.
- Install Anchors Correctly: If using drywall anchors, follow the manufacturer’s instructions precisely for installation. Ensure they are fully expanded or properly seated behind the drywall.
- Use the Right Number of Hangers: Don’t rely on a single hanger for a heavy piece. Use two or more hangers spaced appropriately to bear the weight. For pieces with picture wire, use two hooks on the wall, spaced apart, to provide more stability and prevent the piece from shifting.
- Test the Installation: Before hanging the art, give the installed hardware a firm tug to ensure it feels secure in the wall.
- Hang Carefully: Have someone help you lift and hang larger pieces to avoid dropping them or damaging the art or the wall.
Taking these precautions significantly reduces the risk of your art falling, allowing you to sleep soundly.
Ideal Height and Centering Guidelines
Beyond the 6-8 inches above the headboard rule, consider the vertical space on your wall. You generally don’t want the art to be too close to the ceiling. Aim for a comfortable visual distance between the top of the art and the ceiling or crown molding. If you have very high ceilings, you have more flexibility, but avoid hanging the art so high that it feels disconnected from the bed.
Horizontally, the art or the center of your gallery wall should be centered over the bed. Use your initial center mark as a guide. This creates a balanced and visually pleasing arrangement.
Beyond the Five Ideas: Other Considerations
Once your statement piece is hung, there are a few other elements that can enhance the look and feel of the art above your bed.
Highlighting Your Art with Lighting
Proper lighting can dramatically change how your art looks and feels.
- Picture Lights: Small, dedicated lights mounted above the artwork can illuminate the piece directly, drawing attention to it and highlighting its colors and textures. These come in various styles and finishes to match your decor.
- Adjustable Wall Sconces: Wall-mounted lamps on either side of the bed with adjustable arms can be angled to cast light onto the artwork. This provides both bedside lighting and art illumination.
- Recessed Lighting: If you have recessed lighting in your bedroom ceiling, ensure some fixtures are positioned to shine on the wall art. Adjustable “eyeball” or “gimbal” style recessed lights allow you to direct the beam precisely onto the artwork.
Consider the type of light bulb too. Different bulbs emit different color temperatures (warm or cool light) and can affect how the colors in your art appear. LED bulbs are energy-efficient and come in a range of color temperatures.
Incorporating Personal Photos and Memorabilia
While we’ve focused on traditional art forms, the space above your bed is also a wonderful place to display meaningful personal items. High-quality framed photographs of loved ones, special places, or significant events can be incorporated into a gallery wall or even used as a single statement piece if enlarged and framed beautifully. Other memorabilia, like framed maps of places you’ve traveled or shadow boxes containing cherished objects, can add a deeply personal layer to your wall decor.
Changing Your Display Over Time
Your style and preferences might change, and that’s okay! The art above your bed doesn’t have to be permanent. Consider the possibility of rotating your display over time. This could involve swapping out pieces in a gallery wall, changing a large print within an existing frame, or even completely changing the type of art you have displayed. This keeps your bedroom feeling fresh and allows you to showcase different pieces from your collection or new finds.
Conclusion
Choosing and hanging art above your master bedroom bed is an opportunity to infuse your most personal space with style, personality, and a sense of tranquility or energy. Whether you opt for the bold simplicity of a single oversized canvas, the curated story of a gallery wall, the soft texture of a tapestry, the intriguing depth of a sculptural piece, or the light-enhancing statement of a mirror, the right choice can transform your bedroom into a true sanctuary.
Remember to consider the practical aspects of size, scale, and especially safe installation. By taking the time to plan and choose a piece that resonates with you, you can create a statement above your bed that not only looks beautiful but also contributes to the peaceful and personal atmosphere of your master bedroom retreat. Don’t be afraid to experiment and choose something that you truly love; after all, it’s your space.